
Stop the flashing red light and rescue your laundry in under 10 minutes. You walk in to finish the wash, but the lid is clamped shut, and that red lid lock light is flashing like a heartbeat, clothes are sitting in soapy water, and the machine is refusing to budge. Don’t panic and don’t pull on the lid. 90% of the time a Maytag washer lid lock error isn’t a broken part; it’s a software glitch or a bit of lint, and you can fix the loop yourself without calling a technician.
Table of Contents
1. Safety First, Read This Before Touching Anything
⚠️ Read this fully before Level 2 or Level 3. The emergency rescue in Section 2 is safe to do first, but everything past it needs these precautions.
- Unplug the machine before any step beyond the emergency rescue. The lock circuit runs on standard 120V household current, not a specialized high-voltage system, but it’s still a genuine shock risk; don’t work near the solenoid or wire harness with the machine plugged in.
- Dry your hands and the surrounding area first. You’ll likely be reaching in near standing soapy water during the rescue step; make sure your hands are dry before touching the lock mechanism or any wiring afterward.
- Watch for sharp edges. The metal top panel and bezel clips have edges that can cut on contact, especially when sliding the panel forward. A light pair of work gloves is worth having on for Levels 2 and 3.
- Protect the control board from static. The MCU (main control board) area is sensitive to static discharge; touch a grounded metal surface before handling the wire harness, and never pull directly on the wires themselves (more on why in Level 3).
- Never try to bypass the lock with a wire jumper. This is a safety feature protecting against the lid opening mid-spin, and forcing it can blow a fuse on the control board; see the FAQ for what that actually costs to fix.
- Stop and call a technician if you see burn marks, melted plastic, or corrosion on the control board itself, or if replacing the lock assembly doesn’t clear the error after a full reset (Level 1). At that point you’re likely looking at a board-level issue, not a lock issue, and further disassembly risks turning an affordable repair into an expensive one.
2. The Emergency Rescue: How to Get Your Clothes Out
Before fixing the machine, get your laundry out so it doesn’t start smelling. If power cycling didn’t release the lock, you can manually override it. Unplug the machine before doing this.
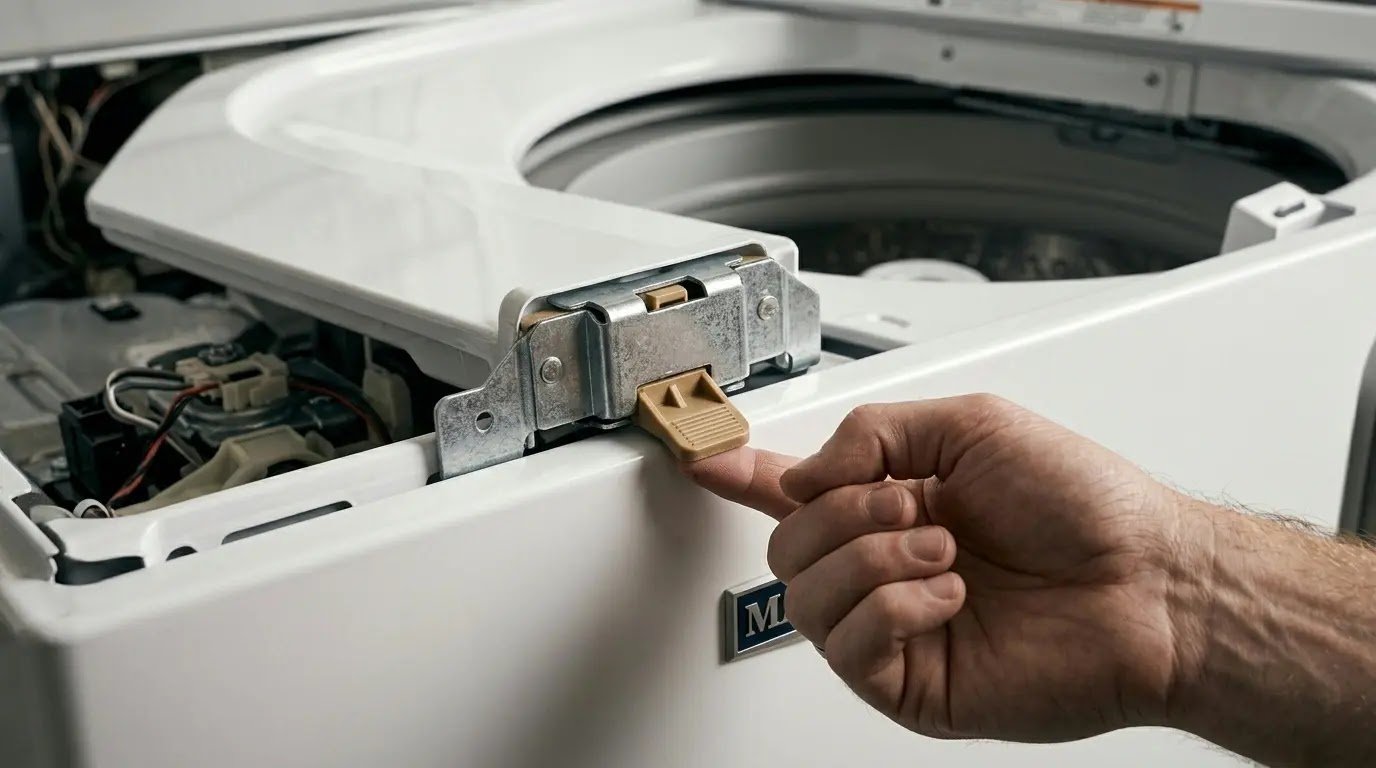
The pro trick: reach under the front center of the top panel (or remove the two rear screws and tilt the top forward). Look for the plastic lock assembly. At the bottom of that box is a small plastic pull tab or manual lever. Pull it toward the front of the machine; you’ll hear a click, and the lid is free.
3. Why Your Maytag Is Stuck: The Solenoid Logic
Inside that plastic lockbox is a solenoid; think of it as a small, powerful electromagnet. When the machine’s control board sends power to it, the magnet pulls a metal bolt to lock the lid. A power flicker or even a small amount of lint in the latch hole can jam that bolt.
Rather than a broken part, the computer often just gets confused because its sensor can’t confirm the lid is safely shut. This shows up more often on machines that haven’t had the latch and strike area cleaned in a while; dust and dried detergent residue are the main enemies of that sensor. If your Maytag keeps re-triggering this error even after the fixes below, an underlying error code may be involved. 👉 [Maytag Washer Cycle Restarts Automatically: 4 Proven Fixes]
4. Level 1 Fix: The Knob Dance Reset
Most people don’t know Maytag top-loaders have a hidden reset sequence for the internal sensors; this is the first thing a technician does before charging a service call fee.
The calibration sequence. Ensure the basket is empty and the lid is down. Perform these turns in under 6 seconds:
- Left 1 click (wait 1 second)
- Right 3 clicks (wait 1 second)
- Left 1 click (wait 1 second)
- Right 1 click (all lights should flash)
- Turn the knob until only the rinse light is on, then press Start
If the machine completes this cycle, the lid lock loop is cleared. If it fails, your machine may be throwing a specific underlying error code worth checking separately.
If you’re weighing whether your current machine is worth this kind of ongoing troubleshooting versus a newer design, that’s a separate question from today’s fix. 👉 [Maytag Front-Load 2026 Review]

5. Level 2: The Toothbrush & Lint Audit
If the reset didn’t work, the problem is likely physical rather than digital. Lint, hair, and dried soap build up inside the strike (the part on the lid) and the latch (the hole on the machine). Even 1mm of buildup can prevent the bolt from sliding fully, which triggers the error.
- The toothbrush fix: use a dry, stiff brush to clear the latch hole; you’ll be surprised how much gunk comes out.
- The WD-40 warning: do not use standard WD-40. It’s a solvent that attracts more dust and will eventually glue the lock shut. If you need a lubricant, use a dry silicone spray instead.
6. Level 3: Replacing the Maytag Washer Lid Lock Assembly
If the knob dance and the toothbrush cleaning didn’t clear the flashing light, the internal solenoid has likely burned out. Replacing it yourself saves roughly $150 in labor. With the machine unplugged (see Safety First):
- Access the rear screws: use a 1/4-inch nut driver to remove the two screws at the back of the top panel.
- The slide & lift technique: modern Maytags require sliding the entire top panel forward about an inch before lifting it, like opening a car hood, not a straight lift.
- The wire harness: locate the plastic plug connecting the lock to the main board. Press the release tab firmly; never pull on the wires themselves, as this can pull the copper pins out of the connector, turning a $45 repair into a $300 board replacement.

7. Buying Parts: OEM vs. Aftermarket
When you search for part number W10404050, still the correct, current part for this repair in 2026, you’ll see cheap versions around $10 and genuine OEM parts around $65. As someone who’s installed both, here’s the honest comparison:
| Feature | Genuine OEM Part | Cheap Aftermarket |
| Sensor accuracy | High (precision calibrated) | Low (frequent ghost errors) |
| Solenoid strength | Heavy-duty magnet | Thin copper (overheats) |
| Lifespan | 5–10 years | 6–12 months |
Insider tip: this same part number fits several brands built on the same Whirlpool manufacturing platform. Whirlpool, Amana, and Kenmore top-loaders often use identical or cross-compatible lock assemblies. Double-check your exact model number before ordering regardless of the brand name on the machine.
If you’re keeping the machine long-term, the OEM part is the only real choice. If you’re planning to replace the washer soon and just need it working in the meantime, the cheap part may be an acceptable band-aid.

Tools you’ll need:
| Tool | Purpose | Difficulty |
| 1/4-inch nut driver | Removing rear top-panel screws | Easy |
| Stiff dry brush | Clearing lint from the latch hole | Easy |
| Dry silicone spray | Lubricating the strike if needed | Easy |
| Work gloves | Protecting hands from panel edges | Easy |
8. FAQ: Maytag washer lid lock stuck?
I replaced the lock, but the light is still flashing. Why?
The computer likely still remembers the old error. Unplug the machine for 10 minutes, then run the Knob Dance calibration from Level 1 to clear the memory.
Can I just bypass the Maytag washer lid lock with a wire?
No. Modern Maytags use a 4-wire system communicating with the board; jumping the wires will blow a surface-mount fuse. This is a safety feature protecting against the lid opening mid-spin, and bypassing it can cost you a $200 board replacement to undo.
Is there a way to prevent this from happening again?
Avoid slamming the lid; the lock assembly is plastic, and heavy slamming misaligns the strike over time. Wiping the latch area every few months keeps lint and detergent residue from building back up. 👉 [Maytag Top-Load Teardown Report]
How long does this whole repair actually take, start to finish?
The emergency rescue takes under 10 minutes. The Knob Dance reset is instant if it works. A full lock assembly replacement, once you have the part in hand, typically takes 20–30 minutes for someone doing it the first time.
Do I need to unplug the machine just to clean the latch hole with a toothbrush?
It’s not strictly required for the front-facing latch hole itself, but it’s still good practice; you may end up reaching further in than planned, and it costs you nothing to unplug first.
Why does the lid stay locked even after a power outage?
Some units retain the last lock state in memory until a proper reset clears it, which is exactly what the Knob Dance sequence in Level 1 is designed to fix. If it doesn’t clear after an outage, treat it the same as any other maytag washer lid lock error and work through the levels in order.
Is this the same lid lock design as front-load washers?
No, front-loaders use a completely different door lock mechanism built into the door frame itself, not a top-mounted solenoid box. This guide is specific to top-load Maytag models with this style of lock.
9. Conclusion
Fixing a Maytag washer lid lock error yourself is about more than saving $200; it’s about knowing you can handle your own home’s hardware instead of waiting days for a service appointment. Work through the levels in order: reset first, clean second, and replace only if you have to. If you take your time, keep the machine unplugged past the rescue step, and use the right OEM part, your washer will be back in action by the afternoon.
If the reset and cleaning don’t resolve it and you suspect a deeper control board issue, start with the reset guide before ordering any parts. 👉 [How to Make Your Maytag Last 20 Years: The 30-Minute Ritual]