

Table of Contents
Introduction: GE Refrigerator Water Dispenser Leaking?
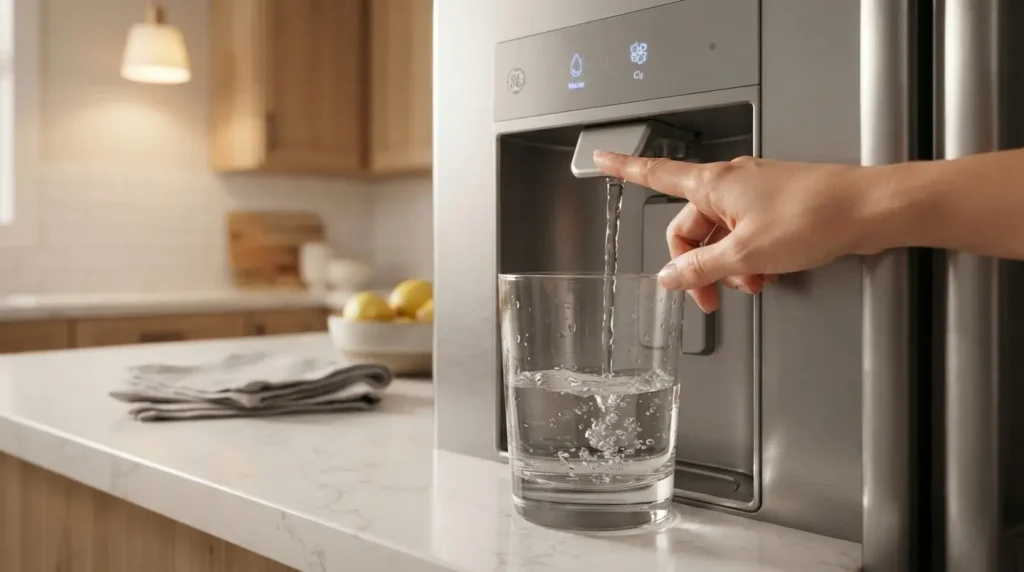
You walk into the kitchen and notice a small puddle forming under your GE refrigerator. Sound familiar? A leaking water dispenser is one of the most common complaints GE fridge owners deal with, and the good news is, most of the time you can fix it yourself without spending a dime on a technician.
This guide covers everything you need to know about GE refrigerator water dispenser leaks in 2026. We’ll look at the five most common causes, walk you through easy step-by-step fixes, and tell you exactly when it’s time to call in a pro. Whether your fridge is dripping constantly or just dribbles after you use the dispenser, there’s a solution here for you.
Let’s stop that drip for good.
Why Is My GE Refrigerator Water Dispenser Leaking?
A GE refrigerator water dispenser can leak for several reasons; some are completely harmless and take two minutes to fix, while others need a closer look.
The most common culprits are the following:
- Air trapped in the water line after a filter change
- A loose, kinked, or cracked water supply line
- An old or incorrectly seated water filter
- A failing water inlet valve
- Incorrect fridge or freezer temperature settings
The tricky part is that a small leak doesn’t always stay small. Left alone, dispenser drips can soak into your flooring, encourage mold growth behind the fridge, and waste a surprising amount of water over time.
Work through the causes below in order, starting with the easiest fixes first.
Cause 1: Air Trapped in the Water Line
This is the most common reason for dripping right after a filter change or after reconnecting your water supply. When air gets trapped in the line, it pushes extra water out of the dispenser in bursts, even after you’ve let go of the lever.
It sounds alarming, but it’s completely harmless and easy to fix.
How to Fix It
- Place a large container or bowl under the dispenser to catch water.
- Press and hold the dispenser lever continuously for 2–3 minutes.
- Pause for 30 seconds, then repeat once more to clear any remaining air pockets.
- Dispose of the first few glasses of water; they may look slightly cloudy. This is normal after a filter change.
💡 Pro Tip: Every time you replace your GE water filter, run at least 2–3 minutes of water through the dispenser before drinking it. This purges air and carbon fines from the new cartridge.
👉 [Read More: GE Refrigerator Ice Maker Not Making Ice]
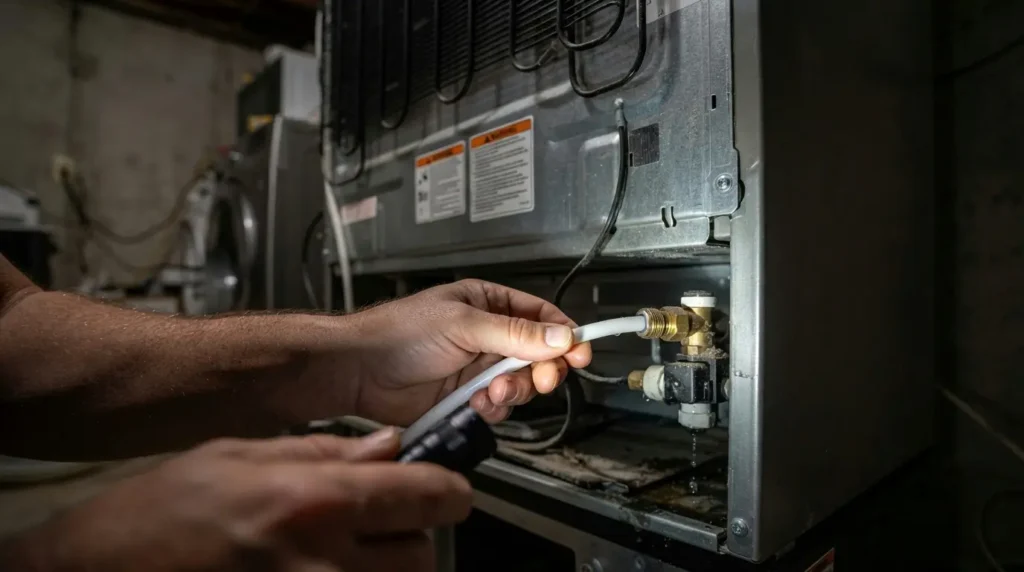
Cause 2: Damaged or Loose Water Line
The water supply line connects your home’s water supply to the back of the refrigerator. Over time, especially if the fridge gets moved or bumped, this line can loosen at the connections, develop kinks, or crack.
A damaged water line typically causes a slow, steady drip at the base of the fridge or along the back wall.
How to Fix It
- Gently pull the refrigerator away from the wall. Make sure you have enough slack in the line.
- Turn off the water supply valve (usually located under the sink or behind the fridge).
- Inspect the full length of the supply line for kinks, cracks, abrasions, or wet spots.
- If the fitting is just loose, tighten it gently with an adjustable wrench. Don’t overtighten; you can crack plastic fittings.
- If the line is cracked or visibly damaged, replace it with a GE-approved braided stainless steel supply line.
⚠️ Warning: Never use a damaged water line “just for now.” Even a hairline crack can become a full burst leak, especially if your water pressure is high. Replace it as soon as you find damage.
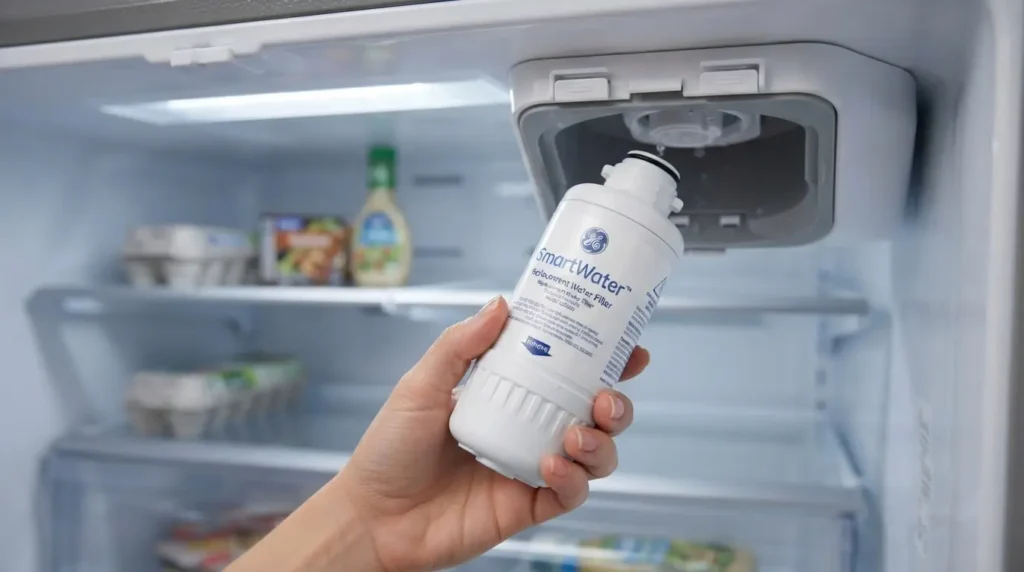
Cause 3: Worn-Out or Clogged Water Filter
Your GE refrigerator water filter needs to be replaced every 6 months, or every 200–300 gallons, depending on your usage. If it’s overdue, a clogged filter can restrict water flow and create backpressure. That pressure forces water to drip out of the dispenser even after you let go of the lever.
A non-OEM (off-brand) filter that doesn’t seat properly can cause the same problem.
How to Fix It
- Locate your filter; depending on your GE model, it’s in the upper-right corner, at the base grille, or in the rear.
- Remove the old filter and check the O-ring seal for cracks or deformation.
- Install a genuine GE-certified replacement filter for your specific model number.
- After installation, flush the dispenser for 2–3 minutes to clear air and carbon dust.
- Write the installation date on a piece of tape inside the fridge; it takes 30 seconds and saves hassle later.
💡 Pro Tip: Stick to OEM GE filters (MWF, RPWFE, or XWFE depending on your model). Off-brand filters frequently cause leaks and reduced flow and can void your warranty.
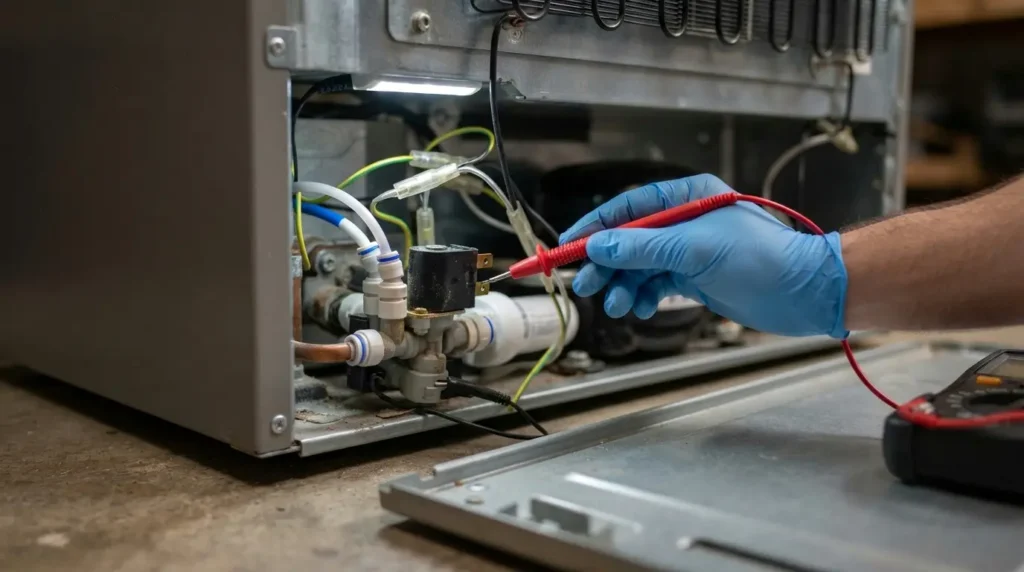
Cause 4: Faulty Water Inlet Valve
The water inlet valve controls how water flows into your refrigerator. It opens when you press the dispenser lever and closes when you release it. If the valve’s internal seals wear out or the solenoid fails to close fully, water will continue trickling even when nobody is using the dispenser.
This kind of leak often shows up as a slow, constant drip from the dispenser, even when not in use.
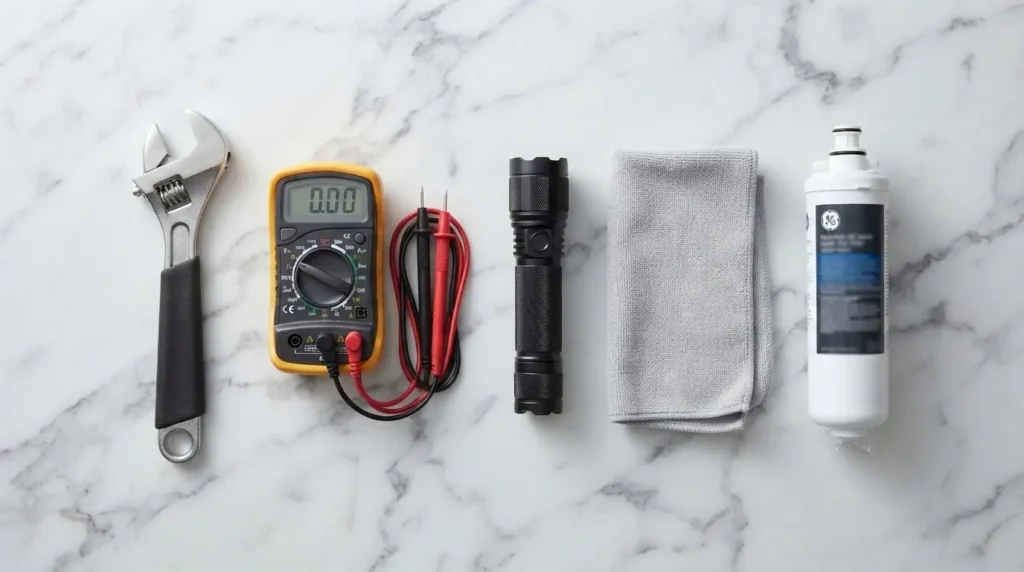
How to Fix It (Advanced DIY)
This repair requires unplugging the fridge and accessing the rear panel. Only attempt if you’re comfortable with basic appliance repairs.
- Unplug the refrigerator from the power outlet.
- Turn off the water supply.
- Pull the fridge from the wall and remove the lower rear access panel (4–6 screws).
- Locate the inlet valve assembly; it’s where the supply line connects to the fridge.
- Look for signs of mineral buildup, external moisture, or corrosion around the valve body.
- Test the solenoid coils with a multimeter. A reading outside 200–500 ohms indicates a failed solenoid.
- If defective, replace with the correct part for your GE model number.
⚠️ Warning: If you’re not confident working around electrical components, skip this and call a certified technician. A mishandled inlet valve can cause water damage or electrical hazards.
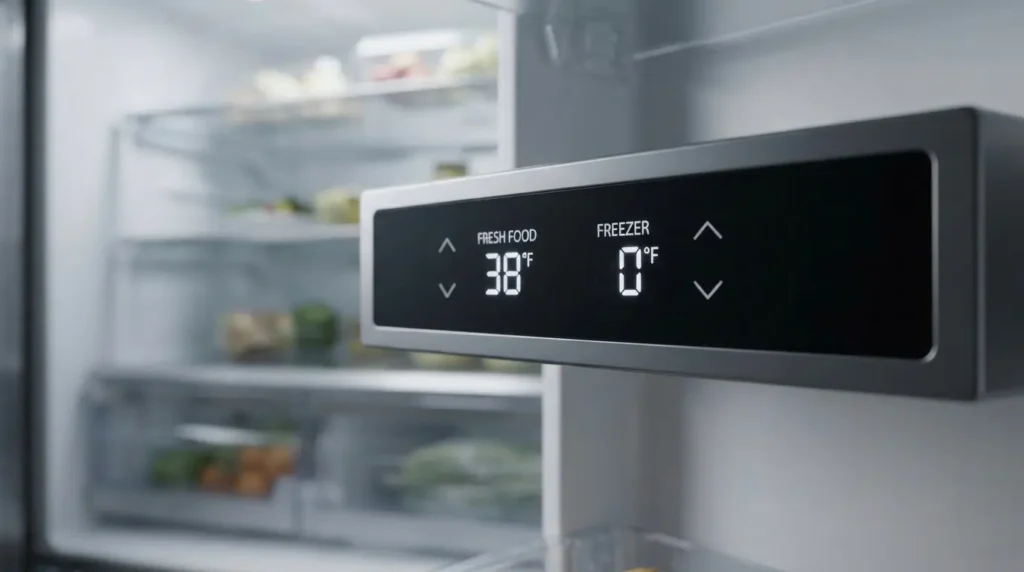
Cause 5: Incorrect Temperature Settings
If your fridge is set too cold, the water line inside can partially freeze. When it thaws during a defrost cycle, it releases a burst of water pressure that drips from the dispenser. If it’s too warm, pressure regulation changes and can also cause intermittent drips.
The Fix Is Simple
- Set your fresh food compartment to 37–40°F (3–4°C)
- Set your freezer to 0°F (-18°C)
- After adjusting, wait 24 hours before checking; your fridge needs time to stabilize
If you recently moved the fridge, had a power outage, or changed settings, a temperature check is always worth doing before diving into more complex repairs.
Common Causes at a Glance, Quick Reference Table
| Cause | Difficulty | Time to Fix | Cost |
| Air in water line | Easy | 5 minutes | Free |
| Loose/cracked water line | Easy–Medium | 15–30 minutes | $10–$30 |
| Worn-out water filter | Easy | 10 minutes | $15–$50 |
| Faulty inlet valve | Advanced | 30–60 minutes | $20–$80 |
| Incorrect temperature | Easy | 2 minutes | Free |
Quick DIY Checks Before Calling a Technician
Before spending money on a service call, run through this checklist:
- Wipe the dispenser area dry and watch where the new drip appears; this tells you exactly which component is leaking.
- Empty and clean the drip tray underneath the dispenser. Overflow from a full tray can look like a bigger leak.
- Check that the fridge is level. A tilted cabinet can cause odd water behavior. Adjust the front leveling feet as needed.
- Confirm the filter is seated correctly. A partially installed filter is one of the most common causes of post-installation leaks.
- Cycle the dispenser several times after any repair to purge residual air and verify the leak has stopped.
When to Call a Professional
DIY repairs fix the majority of GE water dispenser leaks. But there are situations where a certified technician is the right call:
- Leaks continue after flushing the line, replacing the filter, and checking the supply line
- You’ve confirmed the inlet valve is faulty but aren’t comfortable replacing it
- You find moisture or water damage inside the fridge cabinet you can’t trace to the external supply line
- The refrigerator door or frame is misaligned and affecting how the dispenser seals
GE offers certified repair services and can connect you with a local authorized technician through their website.
👉 [Read More: GE Refrigerator Door Not Closing Properly, Alignment Fix Guide]
FAQ
1. Why does my GE refrigerator water dispenser drip after I release the lever?
This is almost always caused by air trapped in the water line or back-pressure from an old water filter. The fix is usually as simple as flushing the dispenser for 2–3 minutes straight. If it still drips, try replacing the water filter, even if it’s not quite at the 6-month mark.
2. Can a dirty water filter cause my GE dispenser to leak?
Yes, absolutely. A clogged or incorrectly seated filter restricts water flow and creates back-pressure in the line. That pressure escapes through the dispenser nozzle. Replace the filter and flush the system, and the dripping usually stops.
3. Is it safe to use my GE fridge while the dispenser is leaking?
It depends on the severity. A minor drip from a trapped air pocket is harmless in the short term. However, a leaking water line or faulty inlet valve can escalate quickly, causing water damage to floors and cabinetry. Fix it as soon as possible, or shut off the water supply to the fridge until you can diagnose it.
4. How often should I replace my GE refrigerator water filter?
GE recommends replacing the water filter every 6 months or after approximately 300 gallons of use, whichever comes first. Heavy-use households may need to replace it sooner. Your fridge will usually light up the filter indicator when it’s time.
5. What’s the average cost to repair a leaking GE water dispenser?
If you DIY it, costs are very low. A replacement water filter runs $15–$50, a new supply line is $10–$30, and an inlet valve replacement part is typically $20–$80. If you call a technician, expect a service fee of $80–$150 plus parts. Most leaks are fixable at home for under $50.
Final Thoughts
A leaking GE refrigerator water dispenser is frustrating, but it’s rarely a major repair. In most cases, you’re looking at a quick filter swap, a 5-minute line flush, or a tightened fitting, all things you can handle on a Sunday afternoon without special tools.
Work through the causes in order: start with the simplest fixes and work your way up. And if you’re ever unsure, there’s no shame in calling a certified technician; it’s cheaper than replacing a water-damaged floor.
The best way to prevent future leaks? Replace your GE water filter on schedule, keep the fridge level, and give that supply line a quick visual check whenever you pull the fridge out to clean behind it.