
Your food is going bad faster than it should. Your fridge is running constantly. And you just noticed a gap around the door where cold air is escaping. Sound familiar? A worn-out LG refrigerator door seal is one of the most overlooked, yet most damaging, problems a fridge owner can face. The good news? You don’t need a technician. You don’t need special tools. You just need the right guide.
In this post, you’ll learn exactly how to replace your LG refrigerator door seal from start to finish. We’ll cover how to find the right seal for your model, how to remove the old one without damage, how to install the new one correctly, and how to test that it’s working. Whether you have a French door, side-by-side, or top-freezer LG unit, this guide has you covered.
Table of Contents
1. What Is an LG Refrigerator Door Seal and Why Does It Matter?
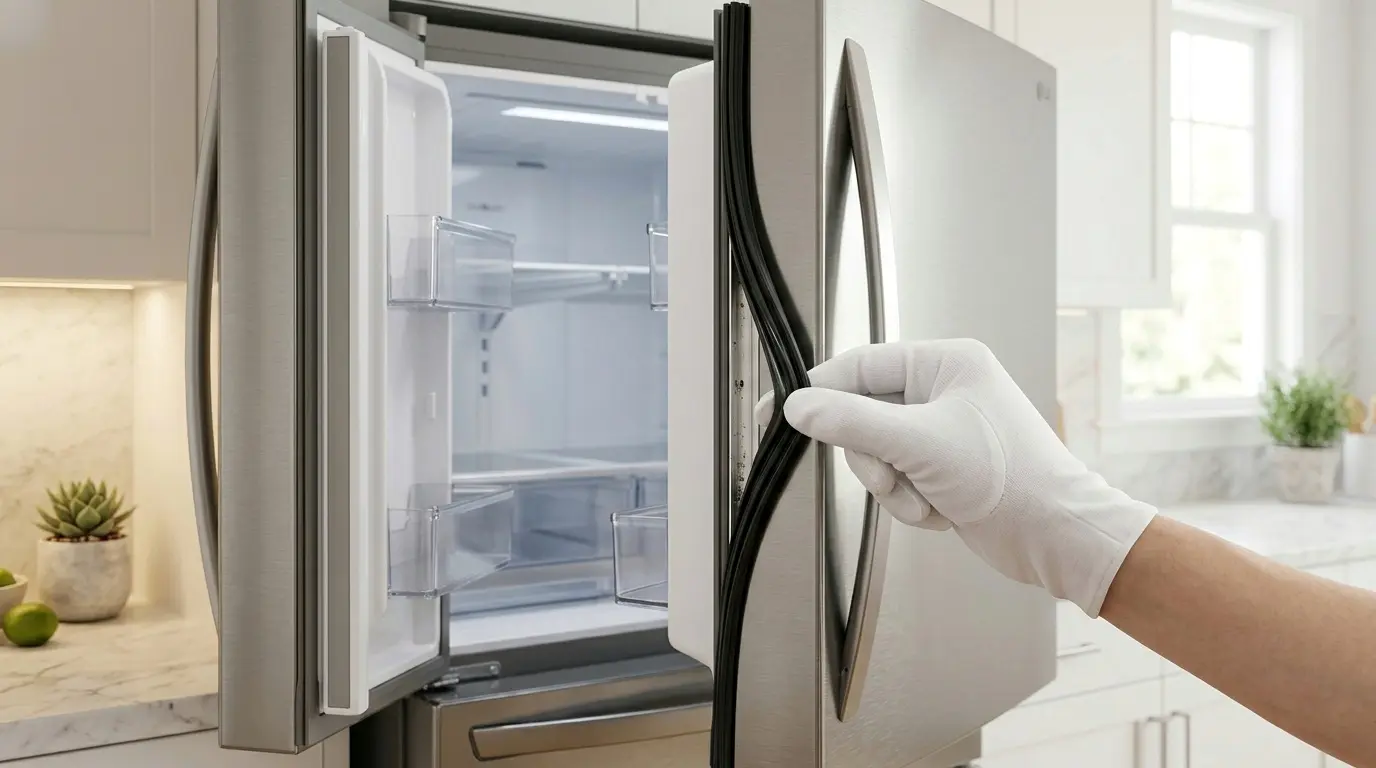
The LG refrigerator door seal, also called a door gasket, is the flexible rubber or magnetic strip that runs along the inner edge of your fridge or freezer door. Its job is simple but critical: keep cold air inside and warm air outside.
LG uses a magnetic gasket design across most of its lineup. This means a thin magnetic strip is embedded inside the rubber. When you close the door, the magnet pulls the seal tight against the cabinet frame, creating an airtight barrier.
Without a properly functioning LG refrigerator door seal, your compressor works overtime. Studies show that a damaged door gasket can increase energy consumption by up to 30%. That’s money leaking out of your wallet every single month.
LG refrigerators, including popular models like the LRMVS3006S (French Door), LRSXS2706S (Side-by-Side), and LTCS24223S (Top Freezer), all rely on this seal to maintain their rated temperature efficiency. LG officially rates these models to hold temperatures within ±1°F of the set point, but only when the seal is intact.
2. Signs Your LG Refrigerator Door Seal Needs Replacing
You don’t need to be an appliance technician to spot a failing seal. Here are the clearest warning signs:
Visual Signs:
- Cracks, tears, or holes in the rubber
- Visible gaps between the seal and the cabinet
- Mold or mildew growing on or inside the gasket
- The rubber has become hard, brittle, or flattened
Performance Signs:
- The fridge runs constantly without reaching target temperature
- Ice crystals forming inside the fridge section (frost intrusion)
- Condensation or moisture collecting around the door frame
- Food spoiling faster than the expiration date suggests
- Your electricity bill has crept up without explanation
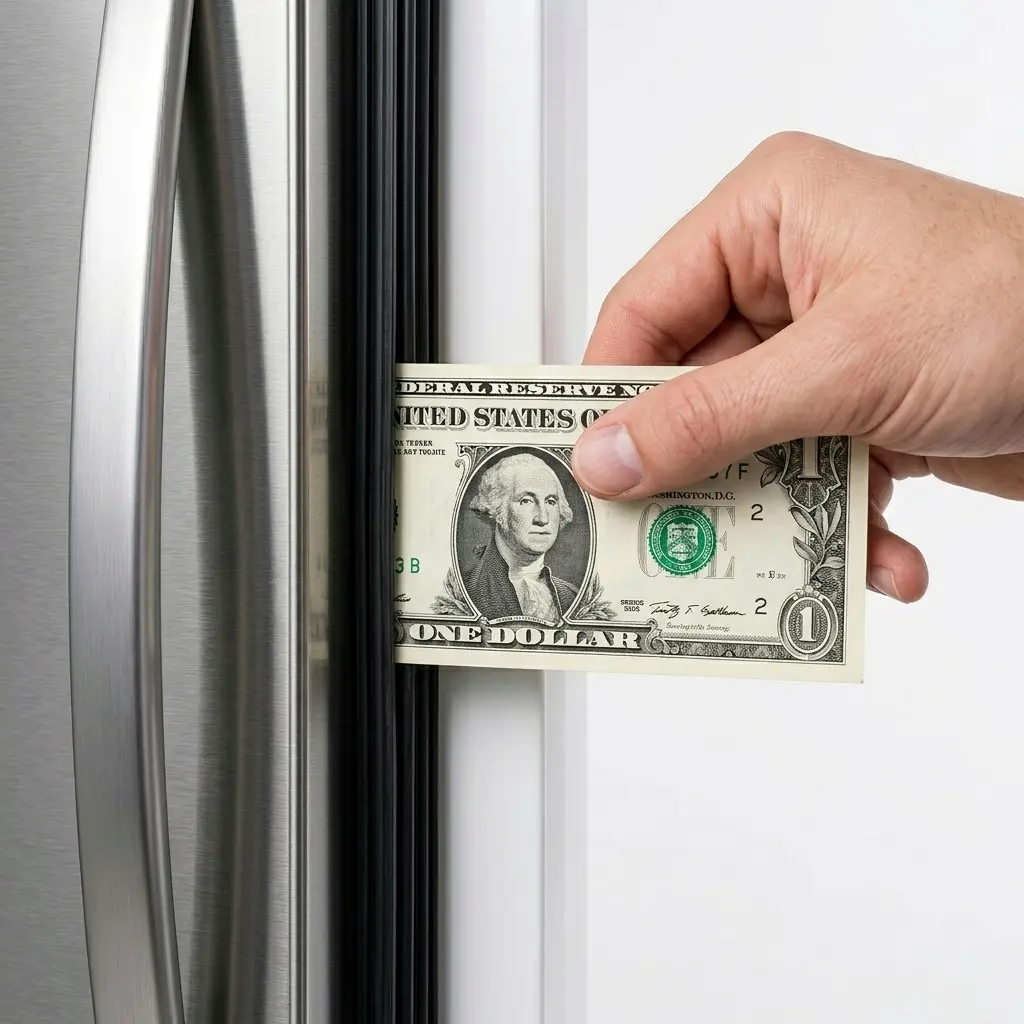
The Dollar Bill Test:
Close your fridge door on a dollar bill. If you can pull it out easily without resistance, your LG refrigerator door seal has lost its grip. A healthy seal should hold the bill firmly in place.
⚠️ Warning: Don’t ignore mold on the gasket. Black mold can grow inside the folds of a degraded seal. This is a health hazard, not just an appliance problem. Replace it immediately if you see black or green mold.
3. How to Find the Right Replacement Seal for Your LG Model
This is the step most people skip, and it’s the one that causes the most frustration. Not all LG refrigerator door seals are interchangeable. You need an exact match.
Step 1: Find Your Model Number
Your LG model number is printed on a sticker inside the fridge. Check:
- The inner left wall of the fridge compartment
- The top inside edge of the door
- Behind the crisper drawers
The model number will look something like LRMVS3006S or LFXS26973S.
Step 2: Match the Part Number
Each LG refrigerator door seal has its own part number. Refer to the table below:
| LG Model | Seal Part Number | Door Type |
| LRMVS3006S | AEC73118601 | French Door (Left) |
| LRMVS3006S | AEC73118602 | French Door (Right) |
| LRSXS2706S | AEC73357901 | Side-by-Side (Fridge) |
| LTCS24223S | AEC73118401 | Top Freezer (Fridge) |
| LFXS26973S | AEC73118501 | French Door Bottom Freezer |
| LRFXS2503S | AEC74453401 | French Door (Left) |
💡 Always cross-reference the part number on LG’s official parts website (lgparts.com) before purchasing. Third-party seals may fit but often lack the precise magnetic strength of OEM parts, which affects long-term performance.
Step 3: Choose OEM or Aftermarket
OEM (Original LG Parts): Best fit, correct magnetic pull, warranty-backed. Typically $35 to $90 per seal depending on model.
Aftermarket Seals: Lower cost ($18 to $45), but quality varies. Brands like WRS Parts and Podoy make compatible options. Read reviews carefully.

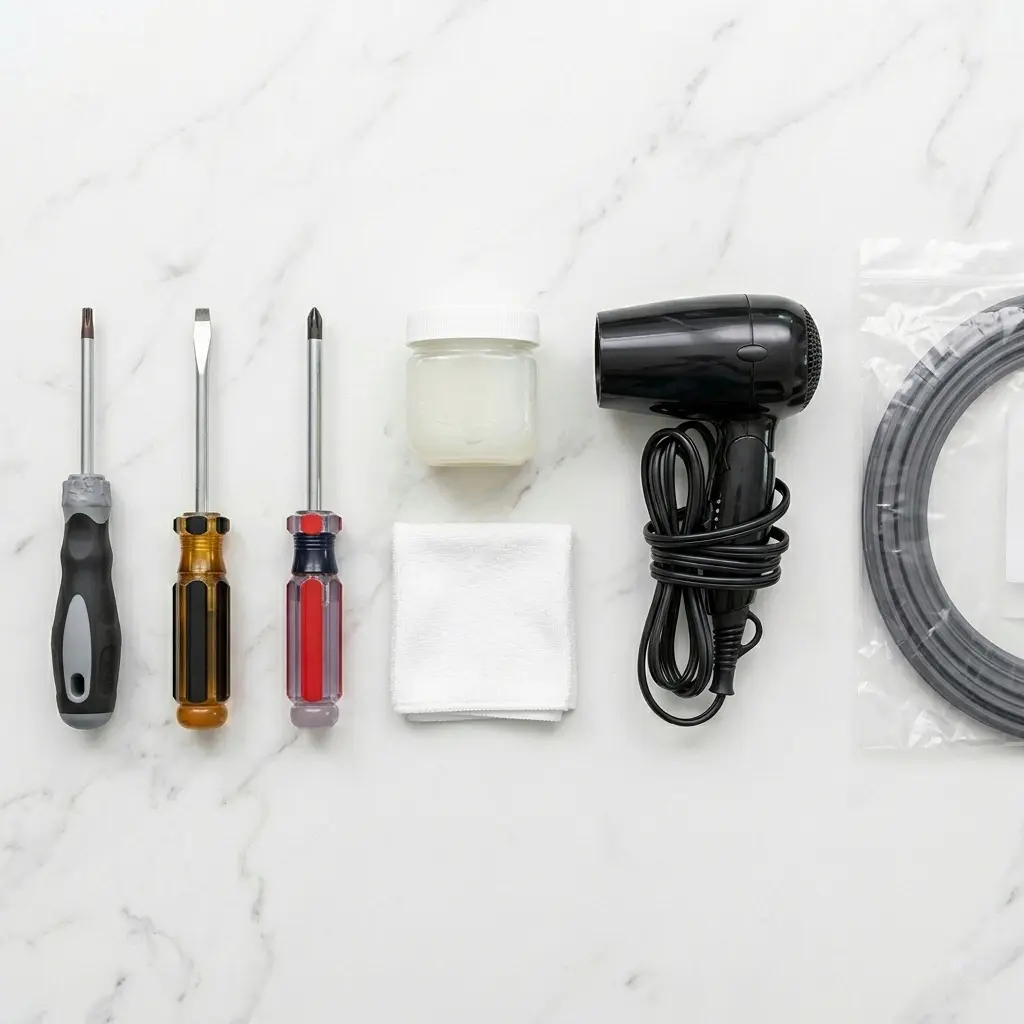
4. Tools You Need Before You Start
The replacement process is straightforward. Here’s what you’ll need:
- Flathead screwdriver (for prying the old seal)
- Phillips screwdriver (some models have retainer screws)
- Hex/Torx screwdriver set (T20 or T25 for some LG models)
- Hair dryer or heat gun (to soften the new seal)
- Warm soapy water and a cloth (to clean the channel)
- Petroleum jelly or silicone grease (to lubricate the new seal)
- Replacement LG refrigerator door seal (correct part number)
No special appliance tools needed. Most households already have everything on this list.
5. Step-by-Step: How to Replace Your LG Refrigerator Door Seal
Take your time with this process. Rushing leads to gaps. A properly seated LG refrigerator door seal takes about 30 to 45 minutes to install correctly.
Step 1: Soften the New Seal First
- Take your new LG refrigerator door seal out of its packaging.
- Submerge it in warm water (not boiling) for 10 to 15 minutes, or use a hair dryer on low heat.
- A flexible seal seats far more easily and evenly.
Step 2: Empty the Door and Unplug the Fridge
- Remove everything from the door shelves.
- Unplug the refrigerator from the wall outlet. This is a safety step; always do it.
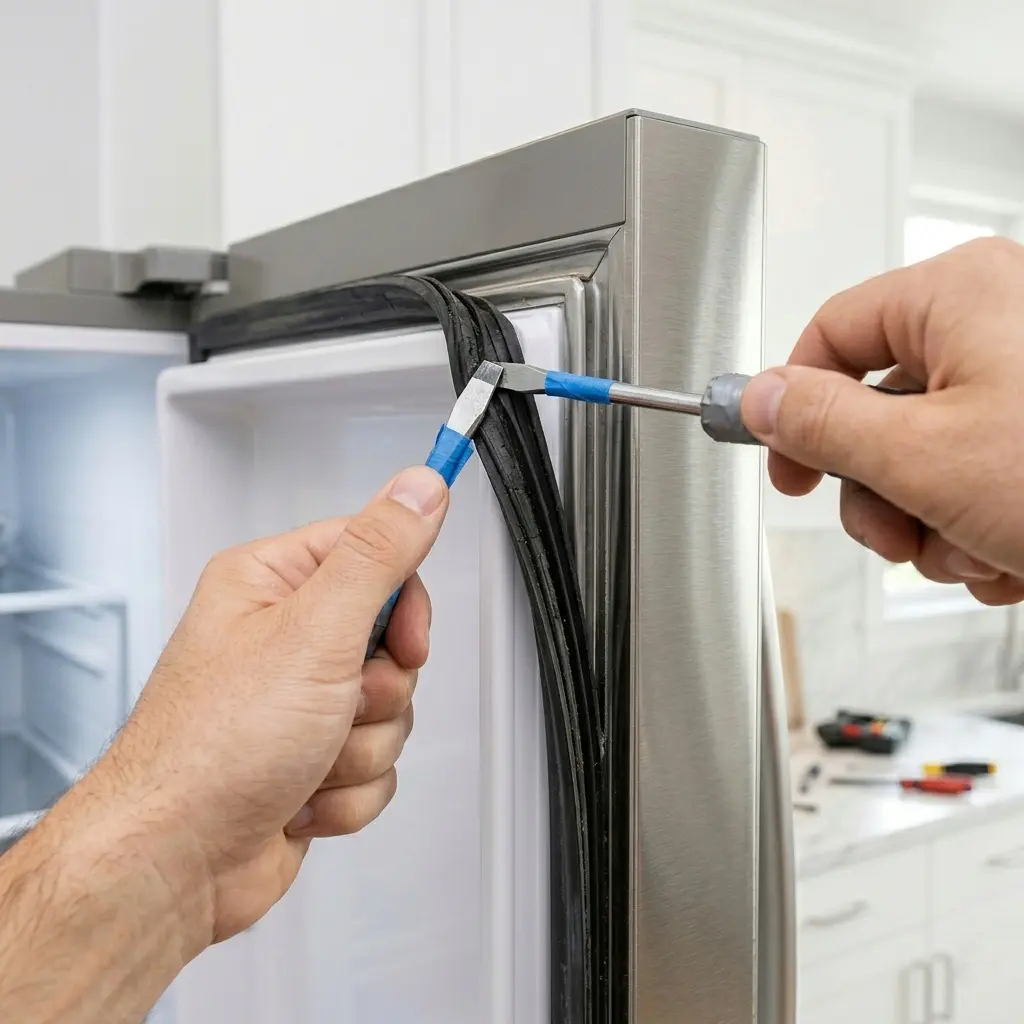
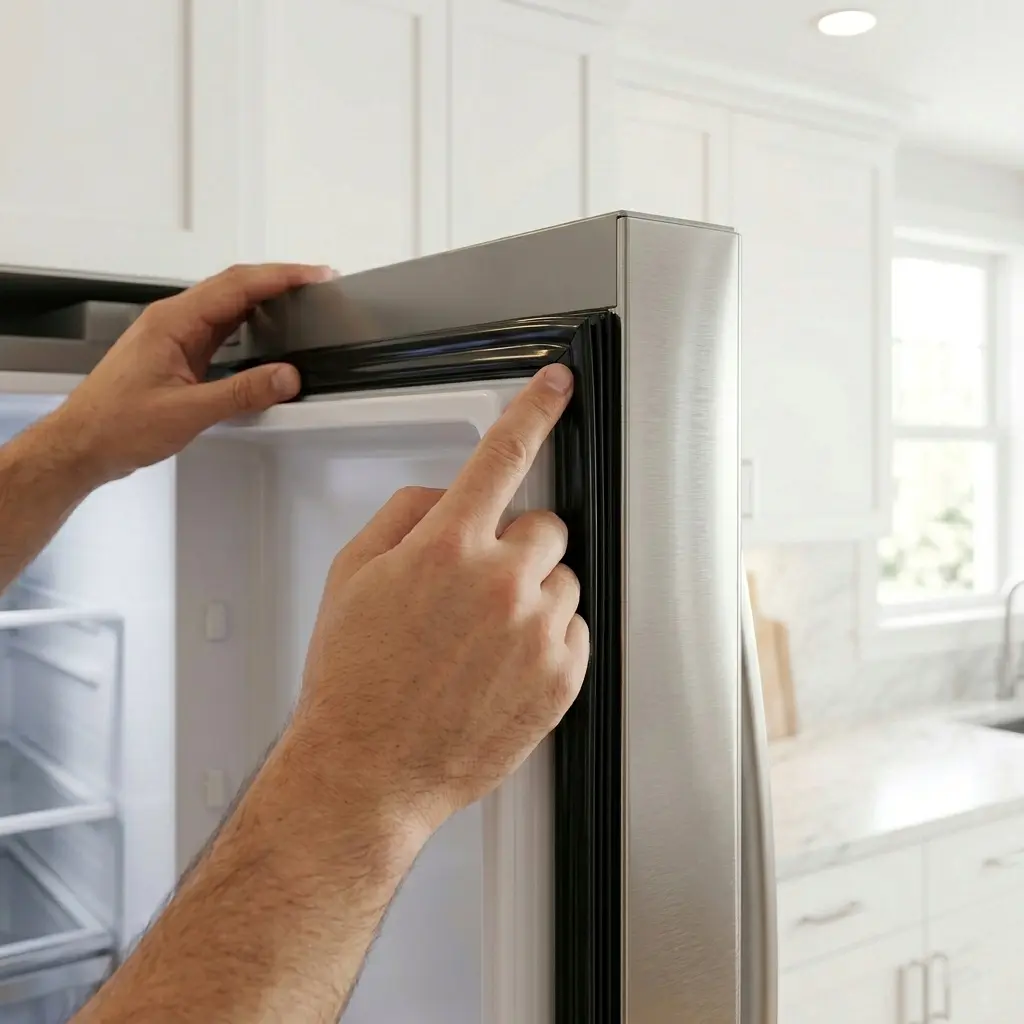
Step 3: Remove the Old LG Refrigerator Door Seal
- Start at one of the top corners. Use your fingers or a flathead screwdriver to gently pry back the inner lip of the old gasket.
- On most LG models, the seal simply pushes into this channel—no screws.
- On older LG models (pre-2019), remove retaining strip screws first.
- Work around the door slowly, pulling the old seal out of the channel section by section.
- If it’s stiff, warm it with the hair dryer.
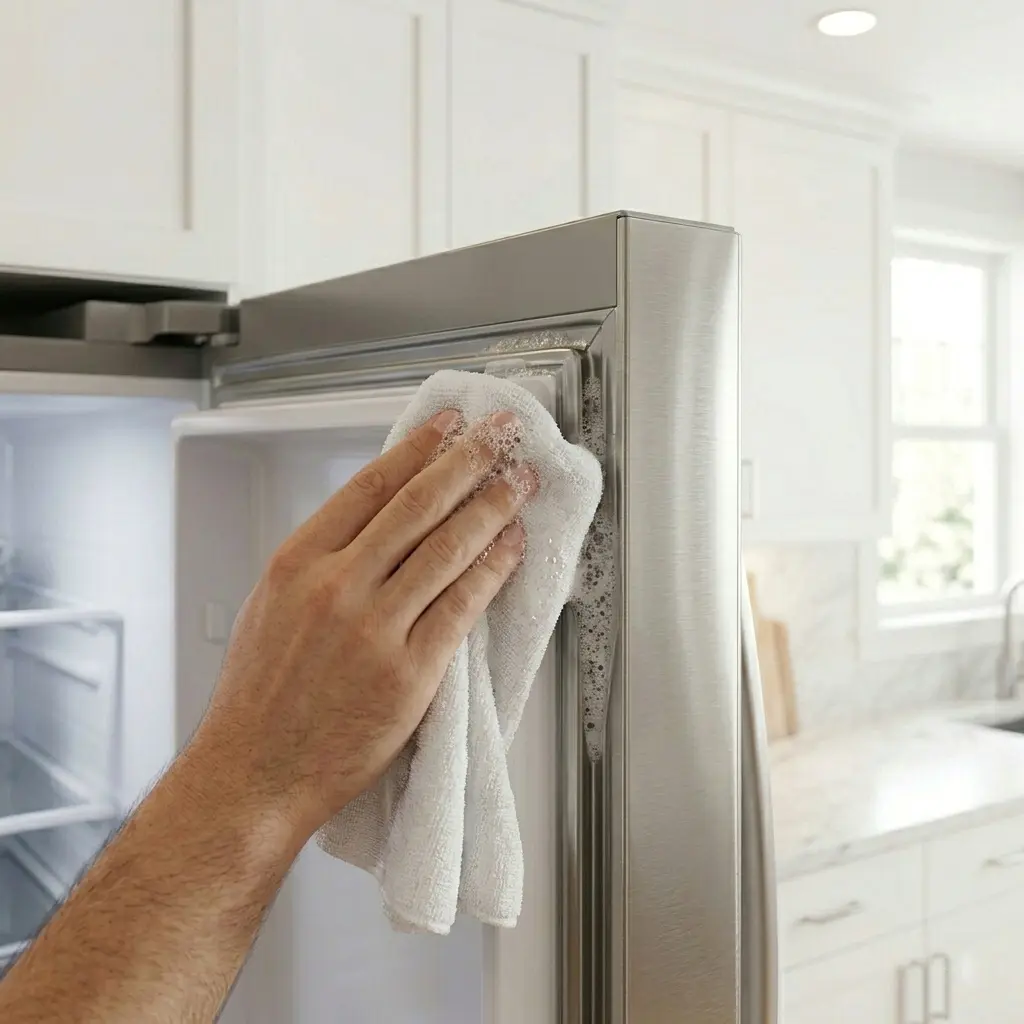
Step 4: Clean the Channel Thoroughly
- Clean the channel completely with warm soapy water and a cloth.
- Dry it fully before continuing. A dirty channel prevents the new LG refrigerator door seal from seating properly.
Step 5: Install the New Seal, Start at the Top Corners
- Position your new seal at the top of the door. Start with the top corners.
- Press the inner lip of the seal firmly into the channel groove.
- Work along the top edge first, then down one side, across the bottom, and up the other side.
- Keep tension even. Don’t stretch the seal, just guide it in.
💡 Use a flathead screwdriver (wrapped in tape to avoid scratching) to press stubborn sections into the channel. Especially useful at the corners.
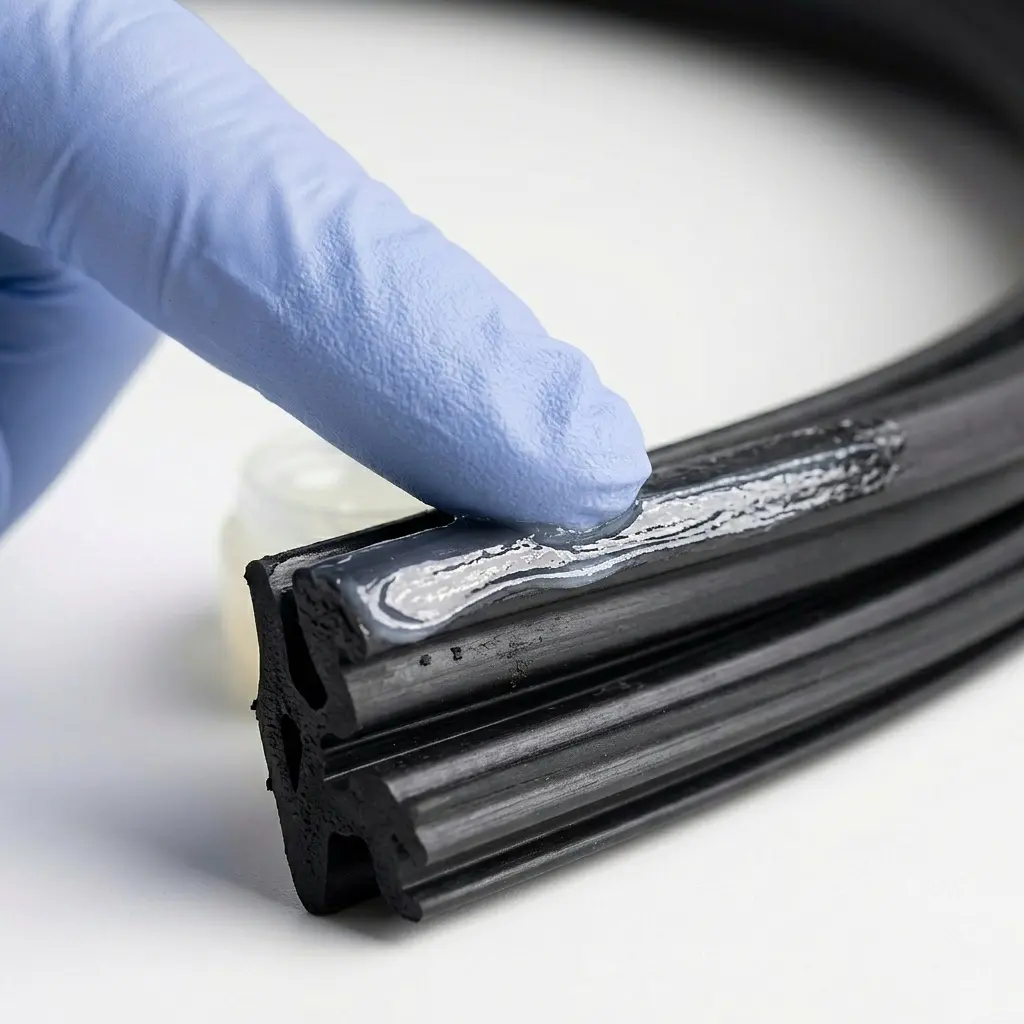
Step 6: Apply Petroleum Jelly to the Seal Lip
- Apply a very thin layer of petroleum jelly or food-grade silicone grease to the outer lip.
- This prevents the seal from sticking to the frame and tearing when you open the door.
Step 7: Check Alignment and Close the Door
- Plug the fridge back in. Gently close the door and check all four edges.
- The LG refrigerator door seal should contact the cabinet evenly with no visible gaps.
- Run your hand slowly around the outside of the closed door; you should feel no cold air escaping.
- Repeat the dollar bill test on all four sides.

Step 8: Allow 24 Hours for Full Compression
- A brand new LG refrigerator door seal needs time to fully compress and conform to the cabinet shape.
- Keep the fridge running normally. After 24 hours, do the dollar bill test again.
6. Common Mistakes to Avoid During Replacement
Even experienced DIYers make these errors. Avoid them and your install will go smoothly.
Mistake 1: Buying the Wrong Part
Not checking the exact part number is the #1 cause of failed replacements. A seal that’s even slightly wrong in size will never seal properly.
Mistake 2: Installing Without Warming the Seal
A cold, stiff gasket won’t seat correctly at the corners. It will pucker, creating tiny gaps you won’t notice until warm air is flooding your fridge.
Mistake 3: Skipping the Channel Cleaning
Old grease and debris prevent the new seal from fully seating. Always clean the channel before installing.
Mistake 4: Stretching the Seal
If you pull the seal too tight while installing, it will relax back to its natural length and pull away from the corners. Guide it in, don’t stretch it.
Mistake 5: Not Doing the Final Alignment Check
Many people install the seal and immediately call the job done. Always do the dollar bill test and visual inspection before closing the fridge for good.
⚠️ Warning: If your new LG refrigerator door seal still shows gaps after 48 hours, the door hinges may be misaligned. This is a separate issue; a misaligned door will defeat even a perfect gasket installation.
7. Pro Tips for a Perfect Seal Every Time
These are the things appliance technicians know that most homeowners don’t:
💡 Use a hair dryer after installation too; run it on low heat slowly around the entire perimeter after installation. The gentle warmth helps the rubber conform perfectly to the channel.
💡 Check Door Hinge Tension First, LG French door models have adjustable hinge tension. LG’s service guide recommends a 3 to 5 second close time for proper compression.
💡 Replace Both Door Seals Together, If one LG refrigerator door seal has degraded significantly, the other is likely not far behind. Replacing both at once saves labor time later.
💡 Store the fridge in a warm room for 24 hours before testing. If your kitchen is very cold (below 60°F), the rubber stiffens and may appear to have gaps that will disappear when the room warms naturally.
💡 Document Your Model and Part Number: Take a photo of the model sticker and the replacement part number. Save it to your phone for next time.
8. Pros and Cons of DIY vs. Professional Replacement
| Factor | DIY Replacement | Professional Technician |
| Cost | $18 to $90 (part only) | $150 to $300 (parts + labor) |
| Time | 30 to 60 minutes | 1 to 2 hour visit window |
| Skill Required | Basic, no experience needed | None required from you |
| Tools Needed | Basic household tools | The technician brings tools |
| Risk of Error | Low if guide is followed | Very low |
| Warranty Impact | None on DIY parts | May maintain LG warranty |
| Best For | Confident DIYers | Rental units, warranty units |
Verdict: For the vast majority of LG owners, DIY replacement is the smarter move. The task is genuinely simple, the parts are affordable, and you’ll finish in under an hour. The only reason to call a technician is if your unit is still under LG’s warranty or if door hinge alignment is also an issue.
Quick Reference: LG Refrigerator Door Seal Facts
| Fact | Data |
| Average lifespan of LG door seal (OEM) | 7 to 10 years |
| Average lifespan (aftermarket) | 3 to 5 years |
| Energy waste from damaged seal | Up to 30% increased consumption |
| Average DIY replacement time | 30 to 60 minutes |
| OEM seal cost range | $35 to $90 |
| Aftermarket seal cost range | $18 to $45 |
| Professional replacement cost | $150 to $300 |
| Dollar bill test grip indicator | Should hold firmly with resistance |
| Time for new seal to fully settle | 24 to 48 hours |
| LG warranty (parts & labor) | 1 year standard (2026) |
| LG linear compressor warranty | 5 years (2026) |
FAQ, 7 Most Asked Questions
Q1: How do I know if my LG refrigerator door seal is the problem and not something else?
The dollar bill test is your fastest answer. If the bill slides out easily anywhere around the door, the seal is failing in that spot. Also check if your fridge runs constantly and the compressor is warm to the touch; these are classic signs of a seal problem, not a compressor issue.
Q2: Can I use super glue or tape to fix a torn LG refrigerator door seal temporarily?
You can use food-safe silicone sealant as a very short-term fix for a small crack, but it’s not a real solution. Tape loses adhesion quickly from moisture and temperature cycling. Replacement is the only real answer. A new seal pays for itself in energy savings within 2 to 3 months.
Q3: My new seal is installed, but there’s still a small gap at one corner. What do I do?
Apply gentle heat from a hair dryer to that corner for 30 to 60 seconds while pressing the rubber firmly into the channel. Then hold it for a minute while it cools. In most cases, this closes the gap permanently. If the gap persists, the part may be slightly wrong; re-check the part number.
Q4: Does LG refrigerator door seal replacement void my warranty?
Replacing a door gasket yourself typically does not void LG’s appliance warranty, as it’s a wear part. However, if your refrigerator is under its 1-year labor warranty, LG will replace it for free. Contact LG support at 1-800-243-0000 before doing DIY work on a unit still under warranty.
Q5: How often should I replace the LG refrigerator door seal even if it looks okay?
Visually inspect it every 6 months. Do the dollar bill test annually. LG recommends proactive replacement every 7 to 10 years for OEM seals regardless of appearance, because the internal magnet loses strength over time even when the rubber looks fine externally.
Q6: Is the freezer door seal the same as the fridge door seal on LG models?
No, they are different parts with different part numbers. The freezer compartment seal is exposed to lower temperatures and is often made from a slightly different rubber compound. Always order each seal separately by the correct part number for each door.
Q7: My LG refrigerator is a bottom freezer model. Is the replacement process different?
The process is essentially the same, but bottom freezer drawer seals attach differently; they connect to the drawer frame rather than a swinging door. These typically require removing the drawer fully and working on the seal from below. Allow extra time (45 to 75 minutes) for bottom freezer drawer seal replacement.
Conclusion
Honestly, replacing your LG refrigerator door seal is one of those jobs that sounds intimidating until you actually do it. Once you have the right part in your hands, the whole thing makes total sense. You pull out the old one, clean the channel, press the new one in, and you’re done.
The payoff is real: lower energy bills, better food preservation, and a fridge that doesn’t work twice as hard as it needs to. Don’t let a $40 part cost you hundreds in wasted electricity and spoiled groceries. Get the correct seal for your LG model today, set aside an hour this weekend, and take back control of your kitchen. You’ve got this.