
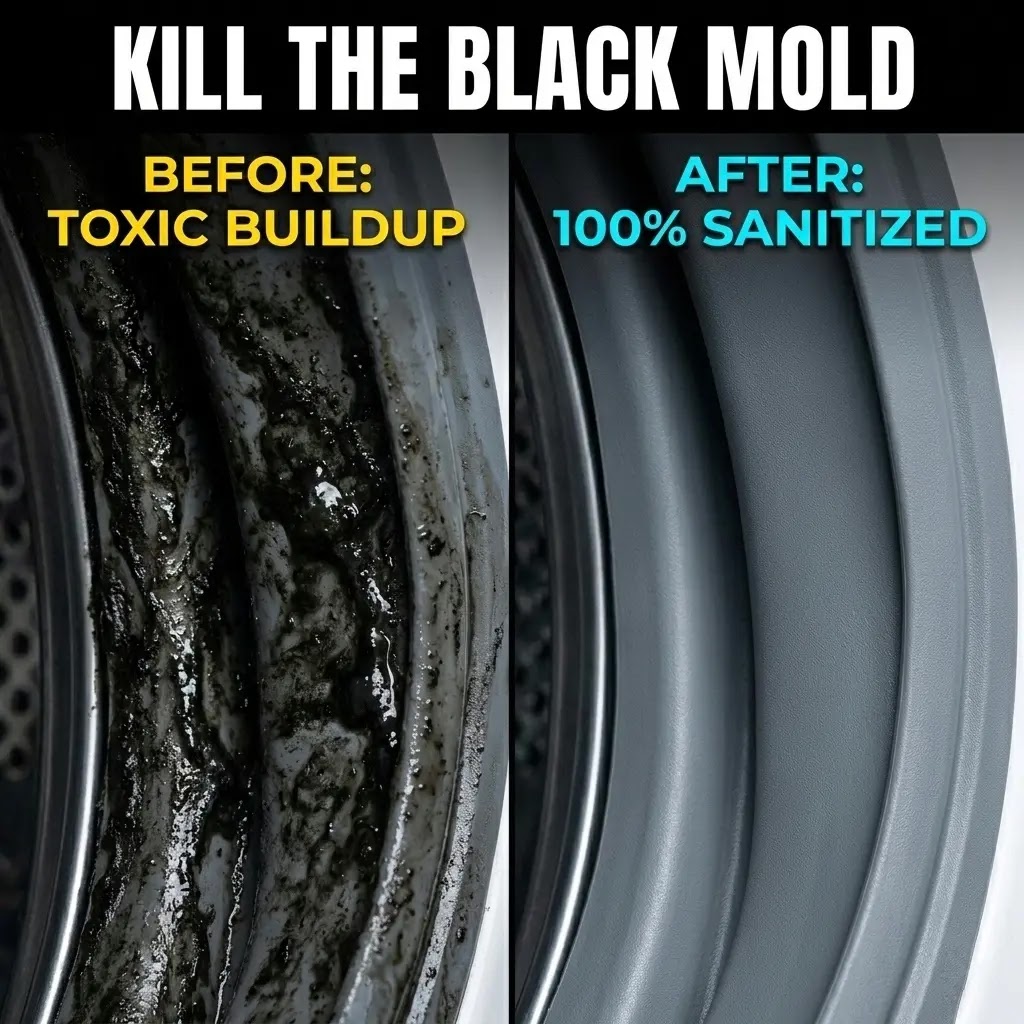
The Definitive Manual for Deep Cleaning Front-Loading Washing Machine Seals
Most homeowners believe that dropping a cleaning tablet into their washing machine solves the washing machine gasket mold problem entirely. This is a myth.
While tablets are excellent at removing limescale and debris from the hidden rear of the drum, they rarely touch the door’s rubber seal, the gasket.
If your regular maintenance isn’t giving you the results you expected, you might be facing a deeper issue.
👉 [Read More: Washing Machine Cleaner Not Working? The Biofilm Secret ]
| The Health Risk: That black slime isn’t just an eyesore; it’s a colony of mold. Every time you wash clothes, water splashes against this mold, releasing fungal spores and allergens into your fabrics. If your clean laundry smells slightly damp or musty, your gasket is likely the culprit. |
Think of it this way: taking a shower cleans your body, but it doesn’t brush your teeth. A drum clean cycle cleans the machine’s body, but the gasket needs its own specific, manual brushing.
Table of Contents
Anatomy of a Gasket: Where Mold Hides
To clean a gasket, you must understand its design. It isn’t just a simple ring of rubber; it’s a complex, multi-folded seal designed to flex as the drum spins.
There are typically two folds. The outer fold is visible, but the inner fold, located near the bottom, stays perpetually wet.
If your machine is even slightly unlevel, water pools in this inner fold. This stagnant, warm, soapy water becomes a nursery for mold growth.
If you notice mysterious stains on your clothes even after cleaning this area, the residue might be coming from behind the drum instead.
👉 [Read More: LG Washer Leaves Black Marks on Clothes? 5 Fast DIY Fixes]
The Paper Towel & Bleach Soak (The Expert Hack)
Scrubbing with a brush often fails because the mold has rooted into the porous rubber. To kill it, you need extended contact time, this is the professional technician’s secret.
- Soak thick paper towels in undiluted liquid chlorine bleach.
- Pull back the rubber fold and stuff these soaked towels deep into the moldy areas.
- Press them firmly so the bleach is in direct contact with the stains.
- Leave them for 2 to 3 hours. The bleach needs this contact time to break down the mold’s cellular wall.

The Drain Hole Clearance
Look at the very bottom of your gasket. You will see three small holes, the drain holes. Their job is to let water return to the outer tub.
However, these holes are magnets for lint, hair, and coins. If they’re clogged, the gasket will never fully dry out.
Use a Q-tip or a small wooden stick to clear any debris. If you don’t clear these, your mold will return within days of cleaning.

Beyond the Surface: The Outer Tub Gunk
Sometimes the mold isn’t just on the gasket, it hides on the metal lip of the outer tub, where the rubber meets the frame.
| Critical Pro Caution: When inspecting this area, only pull the rubber lip back gently. Do not pull the entire gasket off the metal frame. The seal is held by a high-tension steel spring wire. If you dislodge this spring, the gasket will leak, and you will need a specialized spring expansion tool to put it back on. |
Use a flashlight to peek behind the fold and clean with a soft toothbrush.

Material Science: The Chemical Conflict
There’s a constant debate in the cleaning community about the best chemicals to use. Bleach is a powerful mold killer, but it can be harsh on certain parts.
| Chemical | Best For | Caution |
| Bleach | Killing an active mold infestation fast | Corrosive to stainless steel, always follow with an extra rinse cycle |
| White vinegar | Weekly prevention and maintenance wipes | Too weak alone for an established infestation |
| Vinegar + bleach mixed | Never combine | Produces toxic chlorine gas |
| Baking soda + vinegar | Monthly odor maintenance | Safe for seals; not a substitute for a deep clean |
Mixing vinegar and bleach isn’t just inadvisable, it’s dangerous. The acetic acid in vinegar reacts with sodium hypochlorite in bleach to release chlorine gas, which is toxic even in small amounts in an enclosed laundry room.
This is also why a “quick top-up” of vinegar right after a bleach soak is a common mistake. Always run a full rinse cycle between the two, never combine them directly.
| Technical Warning: Bleach is highly corrosive to 304 stainless steel, the drum material. After performing the paper towel soak, run an extra rinse and spin cycle to remove all chlorine residue. If left on the metal, it can cause pitting corrosion, permanent tiny rust holes in your drum. |
The Pro Strategy: use bleach for the initial deep clean to reset the machine. Use vinegar and baking soda for monthly maintenance wipes afterward.
👉 [Read More: Best Washing Machine Cleaners 2025, A Simple Guide to a Fresh Washer]

Prevention: The Dry-Cycle Habit
Mold cannot grow without moisture. If you change your habits, you will rarely need to deep-clean the gasket again.
- The 1-Inch Rule: Never close the door fully after a wash. Leave it open at least an inch so humidity can evaporate.
- The Microfiber Wipe: Keep a dedicated cloth on top of the machine and wipe the bottom fold dry after the last load of the day.
- The Softener Warning: Liquid fabric softeners leave a biofilm that feeds mold. Switch to white vinegar in the softener compartment instead.
Machines on an unlevel floor face this problem worse than most. Even a slight tilt, often just a quarter-inch difference between the front feet, is enough to keep water sitting in the lower inner fold permanently instead of draining after each cycle.
Checking and adjusting the leveling feet takes five minutes and often reduces how often the gasket needs a deep clean in the first place.
Some users are now turning to high-heat methods for sanitization, but is it worth the risk?
👉 [Read More: Is Steam Cleaning Your Washer Safe? A Material Science Review]
Final Verdict: When to Replace?
Sometimes, cleaning is a lost cause. Perform the Tear and Texture Test.
If the rubber feels sticky (melting) or has visible cracks, or if you find water leaking from the bottom of the door, it’s time for a replacement.
A new gasket costs between $80 and $150. While expensive, it’s much cheaper than the thousands of dollars in floor damage caused by a sudden seal failure.
Expert FAQs: Washing machine gasket mold
Q1: I’ve tried bleach, and the black stains are still there. Is it still mold?
A: Sometimes mold stains the rubber permanently, even after the spores are dead. If the surface is smooth and doesn’t smell, the mold is likely dead, but the pigment has bonded with the rubber. Replacement is the only way to get a new look.
Q2: Can I use a pressure washer on my gasket?
A: Absolutely not. The high pressure can puncture the rubber or dislodge the internal spring clamps, leading to a massive leak during the next cycle.
Q3: Why does my machine smell even though the gasket looks clean?
A: Check the detergent drawer and the drain pump filter. Often, mold grows in the soap tray and the smell travels into the drum. The gasket is just one part of the ecosystem.
Q4: How often should I do the full paper towel bleach soak?
A: For most households, once every two to three months is enough if you’re also following the daily drying habits. If you skip the door-open habit regularly, you may need to do this every four to six weeks instead.
Q5: Is it safe to do this method on a machine that’s still under warranty?
A: Yes, cleaning the gasket with bleach doesn’t void a standard manufacturer warranty, since it’s a maintenance task rather than a modification. Just follow the rinse-cycle step afterward to avoid any residue-related issues.
Q6: My gasket has a musty smell but no visible mold. Should I still do the soak?
A: A musty smell without visible mold often means mold is present but hasn’t surfaced yet, especially in the hidden inner fold. It’s worth doing a lighter version of the soak, an hour instead of three, as a preventive step.
Q7: Does a hard water area make this problem worse?
A: Yes. Hard water accelerates mineral buildup around the drain holes at the bottom of the gasket, which clogs them faster than lint alone would. If you’re in a hard water area, check and clear those holes monthly rather than only when you notice odor.
Summary & Conclusion
The gasket crisis is a result of trapped moisture and organic buildup. Cleaning tablets aren’t enough because they can’t reach the folds of the rubber seal.
By using the Paper Towel Soak method, clearing the drain holes, and adopting the habit of leaving the door open, you can eliminate allergens and keep your machine running efficiently.
A clean gasket equals truly clean clothes.
Cleared the gasket but still smelling something off elsewhere in the machine? The problem might be hiding somewhere else entirely.
👉 [Read More: How to Clean Your LG Washing Machine, The 2026 Master Guide]